September 27, 2011

Flat Bread

My sister-in-law is quite the homemaker, actually more like frontier woman in so many ways. She makes tons of stuff from scratch and loves canning. She told me about this recipe for flat bread, and of course the bread is amazing! Like me, I guess she didn't have any potato flour or flakes available, so she recommended using a small potato, peeled, boiled, and mashed. This works great and probably adds some extra moisture to make the breads extra soft.

I recommend storing extra flat breads between pieces of wax paper in a ziploc bag in the freezer.


Flat Bread
from Mel's Kitchen Cafe

*Makes about 8-9 breads

3 to 3 1/4 cups (12 3/4 to 13 3/4 ounces) unbleached all-purpose flour or white whole wheat flour
1 1/2 cups (12 ounces) boiling water
1/4 cup (1 1/2 ounces) potato flour OR 1/2 cup (5/8 ounces) potato buds or flakes (I used potato flakes)
1 1/4 teaspoons salt
2 tablespoons (7/8 ounce) vegetable oil
1 teaspoon instant yeast*

Place 2 cups of the flour into a bowl or the bucket of a bread machine. Pour the boiling water over the flour, and stir until smooth. Lightly cover the bowl or bucket and set the mixture aside for 30 minutes.

In a separate bowl, whisk together the potato flour (or flakes or buds) and 1 cup of the remaining flour with the salt, oil and yeast. Add this to the slightly cooled flour/water mixture, stir, then knead for several minutes (by hand, mixer or bread machine) to form a soft dough. It may look like the flour/salt/oil/yeast mixture will never absorb into the boiling water/flour mixture. It will, I promise, but you may need to take it out of your electric mixer, if using one, and knead the flour in by hand or add it very gradually into your electric mixer.

Note: You can allow the dough to go through the entire kneading cycle(s) in the bread machine, but it’s not necessary; about a 5-minute knead in the machine, once it gets up to full kneading speed, is fine. The dough should form a ball, but will remain somewhat sticky (the dough is fairly stiff, so don’t be worried – just be careful not to overflour the dough). Add additional flour only if necessary; if kneading by hand, keep your hands and work surface lightly oiled. Let the dough rise, covered, for 1 hour (I let mine rise up to 2 hours).

Divide the dough into 8 pieces (each about the size of a handball, around 3 ounces), cover, and let rest for 15 to 30 minutes. Roll each piece into a 7- to 8-inch circle, and dry-fry them (fry without oil) on a griddle or frying pan over medium heat for about 1 minute per side (I cooked mine about 2-3 minutes per side and they didn’t dry out), until they’re puffed and flecked with brown spots. Adjust the heat if they seem to be cooking either too quickly, or too slowly; cooking too quickly means they may be raw in the center, while too slowly will dry them out. Transfer the cooked breads to a wire rack, stacking them to keep them soft. Serve immediately, or cool slightly before storing in a plastic bag.

*This recipe works best with instant yeast because it dissolves during the kneading process, so you don’t have to knead liquid into the dough. If you really prefer to use active dry yeast, use only 1 cup boiling water for the initial dough, dissolve the yeast in 1/4 cup warm water, and add this mixture to the dough along with the potato flour mixture. It’ll be somewhat “slippery” at first, but will knead in and eventually become smooth.

September 18, 2011

Steak with Roasted Corn Salsa

My mom made this recipe and recommended it to me. Hurry and make it before the summer corn crop is over. It's pretty easy - a corn salsa on top of steak - but super tasty!


Steak with Roasted Corn Salsa
adapted from Epicurious

3 cups fresh corn (about 3 ears)
4 scallions, white and green parts thinly sliced separately
2 tablespoons unsalted butter
2 garlic cloves, minced
1 1/2 teaspoons kosher salt
1 1/2 teaspoons ground cumin
1 teaspoon chili powder
1/2 teaspoon black pepper
2 plum tomatoes, finely diced
1 to 2 fresh jalapeƱo chiles, finely diced (including seeds)
1 (2-pound) trimmed boneless sirloin steak, about 1 1/2 inches thick
1/4 cup finely chopped fresh cilantro

Make corn salsa:
Heat a dry large cast-iron skillet over moderately high heat until hot, then pan-roast corn, stirring occasionally, until golden brown, 8 to 10 minutes. Transfer to a bowl.

Cook white part of scallions in butter with garlic, 1 teaspoon salt, 1/2 teaspoon each cumin and chili powder, and 1/4 teaspoon pepper in skillet over moderate heat, stirring, until scallions are tender, 3 to 4 minutes. Remove from heat and stir in corn, tomatoes, and jalapeƱos.

Grill steak:
Combine remaining 1/2 teaspoon salt, 1 teaspoon cumin, 1/2 teaspoon chili powder, and 1/4 teaspoon pepper and sprinkle on both sides of steak. Grill, turning once, until an instant-read thermometer inserted horizontally into thickest part of meat registers 130°F, 18 to 20 minutes total for medium-rare. (Non grill method: heat a cast iron skillet on medium high heat. Add a splash of olive oil. Cook each side of the steak for a few minutes until 130°F.) Transfer steak to a grooved cutting board and let stand 5 to 10 minutes before slicing.

While steak is standing, reheat corn mixture over moderate heat, stirring occasionally. Stir in cilantro and scallion greens.

Spoon corn on top of sliced steak and pour over any accumulated juices.

September 11, 2011

Magic Shell Chocolate Sauce

Magic Shell chocolate sauce, if you didn't know, is the chocolate syrup that hardens into a shell when poured on ice cream. It really is magical. Now you can make your own! This recipe worked like magic too.


Homemade Magic Shell Chocolate Sauce
from 52 Kitchen Adventures

7 oz. chocolate, roughly chopped
2 T coconut oil

In a heat-proof bowl, place chocolate and coconut oil in microwave. Heat 30 seconds at a time, stirring in between, until fully melted. (Or, in a double boiler, heat chocolate and coconut oil over water on medium high heat, stirring frequently until fully melted.) Set aside to cool. Pour over ice cream.

Store in air-tight container in refrigerator. Heat in microwave for 30 seconds before use.

September 8, 2011

Mediterranean Eggplant Barley Salad

So eggplant and I don't get along that well. I need help learning to understand and appreciate this vegetable. While I really haven't that tried that hard to improve our relationship, I have hope for us because of this excellent barley salad with roasted eggplant. This salad is scrumptious. Really. The fresh herbs and tomato pair well with the roasted eggplant and zucchini and salty olives. And barley gives a satisfying, grainy support to any dish. Eggplant are still in season. If you already love eggplant or want to give it another chance, start with this salad.


Mediterranean Eggplant and Barley Salad
from Gourmet, September 2006 but found through Smitten Kitchen

Makes 4 (main course) or 8 (side dish) servings

1 1/2 lb eggplant, cut into 1/2-inch cubes
3/4 lb zucchini, cut into 1/2-inch cubes
10 tablespoons extra-virgin olive oil
1 teaspoon salt
1 teaspoon black pepper
1 cup chopped scallion
1 1/2 teaspoons ground cumin
1/2 teaspoon ground coriander
1/4 teaspoon cayenne
1 1/4 cups pearl barley (8 oz)
1 (14-oz) can reduced-sodium vegetable or chicken broth (1 3/4 cups)
3/4 cup water
2 tablespoons fresh lemon juice
1 garlic clove, minced
1/4 teaspoon sugar
1/2 lb cherry tomatoes, quartered
1/3 cup Kalamata or other brine-cured black olives, pitted and halved
1/2 cup thinly sliced red onion, rinsed and drained if desired
1 cup chopped fresh flat-leaf parsley
1/2 cup chopped fresh mint

Accompaniment: 1 (1/2-lb) piece ricotta salata, cut crosswise into thin slices

Roast eggplant and zucchini: Put oven racks in upper and lower thirds of oven and preheat oven to 425°F.

Toss eggplant and zucchini with 5 tablespoons oil, 3/4 teaspoon salt, and 3/4 teaspoon pepper in a bowl, then spread in 2 oiled large shallow (1-inch-deep) baking pans. Roast vegetables in oven, stirring occasionally and switching position of pans halfway through baking, until vegetables are golden brown and tender, 20 to 25 minutes total. Combine vegetables in 1 pan and cool, reserving other pan for cooling barley.

Cook barley: Heat 2 tablespoons oil in a 3- to 4-quart heavy pot over moderately high heat until hot but not smoking, then cook scallion, cumin, coriander, and cayenne, stirring, until fragrant, about 1 minute. Add barley and cook, stirring until well coated with oil, 2 minutes more. Add broth and water and bring to a boil. Reduce heat and simmer, covered, until all of liquid is absorbed and barley is tender, 30 to 40 minutes. Remove from heat and let stand, covered, 5 minutes. Transfer to reserved shallow baking pan and spread to quickly cool, uncovered, to room temperature, about 20 minutes.

Make dressing and assemble salad: Whisk together lemon juice, garlic, sugar, and remaining 1/4 teaspoon salt, 1/4 teaspoon pepper, and 3 tablespoons oil in a large bowl. Add barley, roasted vegetables, and remaining ingredients to bowl with dressing and toss until combined well. Serve with cheese slices.

Do ahead: Salad can be made 1 day ahead and chilled, covered. Return to room temperature before serving.

September 7, 2011

Zucchini

Here's my third featured vegetable in my series, though you are probably already familiar with it: zucchini. Zucchini is a summer squash (winter squash have very hard skins) and is so versatile. It's a vegetable you'll find in a variety of recipes.


Take a look at the variety here:
Quinoa Summer Salad
Confetti Orzo Salad with Chicken
Zucchini and Ricotta Galette
Bibimbap
Roasted Vegetable Lasagna
Fusilli with Zucchini and Butter
Zucchini Bread
Savory Corn and Zucchini Muffins
Zucchini Apple SpiceMuffins

And how about chocolate and zucchini? I've made these before, but haven't blogged about them:
Chocolate Zucchini Cupcakes

One of my go-to vegetable side dishes is sauteed zucchini. It's so easy and cooks up rather quickly. I often don't have energy for side dishes, but there's no excuse not to make this one.


Sauteed Zucchini

zucchini
olive oil
garlic, minced
coarse salt
freshly ground black pepper


Slice zucchini into half-inch thick slices, and if desired, in half to form semi-circles. Sprinkle with salt and pepper.

Heat a splash of olive oil over medium heat in a large skillet. Add minced garlic and spread in pan. Add zucchini in a single layer, seasoned side down. Depending on how much zucchini you have, you may need to work in batches. Sprinkle the other side with more salt and pepper. Let saute for a few minutes, until golden brown. Flip over and cook the other side until golden brown. Remove from pan and serve.

September 4, 2011

Peach Salsa

Through my peach canning days, I had a few extra peaches and decided to make a small batch of peach salsa. I've had pineapple salsa, mango salsa, and now peach salsa. Each time the thought of fruit salsa kind of weirds me out, but after taking a bite, I'm hooked.


Peach Salsa

6 peaches, peeled pitted and diced (about 1 1/2 cups)
1 medium sized red bell pepper, seeded and diced (about 1 cup)
1 cup loosley packed cilantro, chopped
1/4 cup finely diced red onion
1 jalapeno, seeded and finely diced
1 clove garlic, minced
1-2 limes, juiced
1/2 teaspoon salt

Combine all ingredients. Serve with tortilla chips.

September 2, 2011

Canned Peaches and Peach Butter

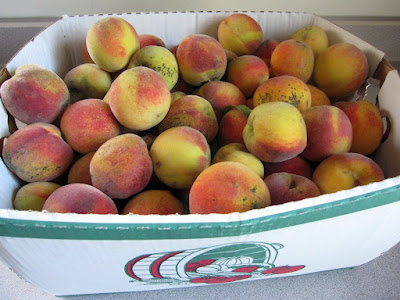
I've finally joined the canning club! For Christmas, I received some canning gear, including a water bath canner (a large pot with wire rack). Since we've arrived in the summer bounty season, I thought I'd start with peaches. Here's the half bushel of peaches I purchased from the peach/apple seller at the farmer's market.


Some of the peaches had black spots on the skin, but the peach flesh was not affected. Here's my end product: 4 quarts, 7 pints, and 3 8-oz. peach butters. I'm being patient and have not tried anything yet. How can peaches and sugar go wrong?


I used canning instructions and recipes from the Ball Complete Book of Home Preserving.
Light Syrup
syrup yield: 6 cups (1.5 L)

2 1/4 cups (550 mL) granulated sugar
5 1/4 cups (1.3 L) water

In a stainless steel saucepan, combine sugar and water. Bring to a boil over medium-high heat, stirring until sugar is dissolved. Reduce heat to low and keep warm until needed, taking care not to boil the syrup down.


Peaches in Syrup
Makes about eight pint (500 mL) jars or four quart (1 L) jars

8-12 lbs (3.6-5.5 kg) peaches, peeled, halved, pitted, treated to prevent browning and drained
1 batch hot syrup

Raw pack method:

1. Prepare canner, jars and lids.

2. Pack peaches, cavity side down and overlapping layers, into hot jars to within a generous 1/2 inch (1 cm) of top of jar. Ladle hot syrup into jar to cover peaches, leaving 1/2 inch (1 cm) headspace. Remove air bubbles and adjust headspace if necessary, by adding hot syrup. Wipe rim. Center lid on jar. Screw band down until resistance is met, then increase to fingertip-tight.

3. Place jars in canner, ensuring they are completely covered with water. Bring to a boil and process pint (50 mL) jars for 25 minutes (30 minutes in my case) and quart (1 L) jars for 30 minutes. Remove canner lid. Wait 5 minutes, then remove jars, cool and store.


Peach Butter
Makes about eight 8-oz (250mL) jars or four pint (500 mL) jars

4 1/2 lbs (2 kg) peaches, peeled, pitted and coarsely chopped
1/2 cup (125 mL) water
grated zest and juice of 1 lemon
4 cups (1L) granulated sugar

1. In a large stainless steel saucepan, combine peaches, water and lemon zest and juice. Brint to a boil over medium-high heat. Reduce heat and boil gently, stirring occasionally, until peaches are soft, about 20 minutes.

2. Working in batches, transfer peach mixture to a food mill or a food processor fitted with a metal blade and puree just until a uniform texture is achieved. Do not liquefy. Measure 8 cups (2 L) of peach puree.

3. In a clean large stainless steel saucepan, combine peach puree and sugar. Stir until sugar dissolves. Bring to a boil over medium-high heat, stirring frequently. Reduce heat and boil gently, stirring frequently, until mixture thickens and holds its shape on a spoon.

4. Meanwhile, prepare canner, jars and lids.

5. Ladle hot butter into hot jars, leaving 1/4 inch (0.5 cm) headspace. Remove air bubbles and adjust headspace, if necessary, by adding hot butter. Wipe rim. Center lid on jar. Screw band down until resistance is met, then increase to fingertip-tight.

6. Place jars in canner, ensuring they are completely covered with water. Bring to a boil and process for 10 minutes. (15 minutes in my case.) Remove canner lid. Wait 5 minutes, then remove jars, cool and store.